Step 1: Take the Pictures
You need at least 2 pictures for this to work. The important thing to realize is that human eyes are separated by a few centimeters. If you want to duplicate this effect, you need to take two photos and move between each one. If you want a more pronounced effect, you can shift more than a few centimeters, but I wouldn't recommend shifting by more than a foot (30 cm).
An alternative is to have two cameras attached together and going off at the same time. The advantage there is that by taking simultaneous images you don't have to worry about any moving objects, rotating the field of view, or capturing a slightly different angle. Unfortunately, you do need two cameras and a more complicated setup.
Let's consider you have one camera only, like I do. You take image 1, then you shift by about 10-20 cm or so to the right and, facing the same direction, take image 2. Ideally you will not have any moving objects (cars, birds, etc) in your frames. If you do, these will ruin the desired effect. Try not to rotate the camera in any way when shifting, just face the same direction. The two images will look very similar, but there will be minor perspective changes. It is these changes that will provide the illusion of depth.
Here are two such frames I've taken. I've placed them side by side for two reasons. One is so you can compare them. The other is that by displaying these images side by side and crossing your eyes you can see a 3D image and can check that everything is fine. It takes a bit of practice to learn how much to cross your eyes. You basically want to see 3 images, the one at the center will be the combination of both of them and will have the added depth perspective. Remember that you can click these images to see them larger.

The images above were taken with a SONY DSC-S500 6MP camera so as to demonstrate that you don't really need a fancy camera for this. I've used the iPhone camera to make good anaglyphs as well. I usually (like in this case) reduce the raw image size to 1024x768 so as to make them easier to process.
Step 2: Load up the images on GIMP
GIMP is a free and powerful image processing tool. The basic tasks to produce an anaglyph are fairly simple, so any decent image processing program should be able to work. So feel free to use Photoshop or similar programs if you have them.
You can either open up the image directly in GIMP or open the program blank and copy-paste the image onto the frame. Dealing with large images can take up a lot of processing power. It's up to you how big you want your images, but as this technique does have it's faults I try not to go beyond 1024 pixels in one dimension. If you have a good camera, a steady hand, and a beautiful shot, then go ahead and use the largest you can handle!
You want to load up the two images in separate layers. In GIMP, this is accomplished easily. When you paste the frame, click on the new layer icon on the Layers Dialog window and it will automatically create a new layer with the image you just pasted. Or even easier: just go to Edit -> Paste As -> New Layer.
Step 3: Make Some Color Layers
Set a new foreground color to FF0000; this is red. Make a new layer and select the Fill Type to be the foreground color. You will have a uniform red layer. Set the layer mode to Screen, duplicate this layer, then do Color -> Invert. That will basically produce another layer with color 0000FF, which is cyan. You could have created the second layer the same way as the first layer, though. The important thing is that both layers must have mode=Screen activated (you can do set on the Layers Dialog window).
Step 4: Merging Layers
Move the layers so that you have them in this order: Cyan, Image 2, Red, Image 1. Image 1 is the left-hand image I have above and Image 2 is the right-hand image. It is very important to get this right otherwise you will need to flip your red/blue glasses backwards (your left eye should see the red image). Activate only the Cyan and Image 2 layers (ie, hide the other two). I do this by clicking the eye symbols on the Layers Dialog window. Merge those two layers (Image -> Merge Visible Layers) and set the mode to Multiply. Now activate all layers and look at the result:

That works, but I personally don't like it. The shift is a little bit too large, especially for the center feature. This brings us to the last step.
Step 5: Tweak to Perfect
With the cyan-merged frame selected, use the Move tool to tweak the image until getting a desirable result. You may also find that you need to apply a small rotation. I personally like distant objects to be neutral (ie, no red/cyan on their edges). However, that may cause some of the foreground material to be too far shifted. You want to hit a balance such that things don't appear too close or your eyes will have trouble seeing details. Here I aim for such a balance and crop out some of the edges:

This is the version I'm happy with and so I save it as a PNG or any other format I prefer.
Images taken July 2011 at Joshua Tree National Park in California. More such anaglyphs I've created can be found in my Picasa albums.
Remember that there is some eye strain when crossing your eyes and when looking at these artificial 3D images, so don't spend too much time looking/creating them or you'll end up with a headache.
Remember that there is some eye strain when crossing your eyes and when looking at these artificial 3D images, so don't spend too much time looking/creating them or you'll end up with a headache.
Common pitfalls to avoid:
- The two images are slightly rotated. This can be fixed in GIMP, but is a bit more involved.
- Different light levels in the images. Again this can be fixed, but ideally you want similar light levels on both raw images.
- Intense red/blue colors. Most red/cyan glasses aren't perfect and if you have some bright colors this can mess up the intended effect. For example, a red rose will not end up very nice as an anaglyph.
- Moving objects. Sometimes a bird in the background appears in only one frame, or the wind shifted a flag, or you have a shot of the sea. If it has motion, it's going to be tricky to arrange with this simple setup. You may have to use some dual-camera setup.
A few anaglyphs I've made are displayed below for your viewing pleasure, more can be found here:
 |
| The Kitt Peak National Observatory (KPNO) |
 |
| The Shane 3-m telescope at Lick Observatory |
 |
| Camptosaurus at the Museum of Natural History in Los Angeles |
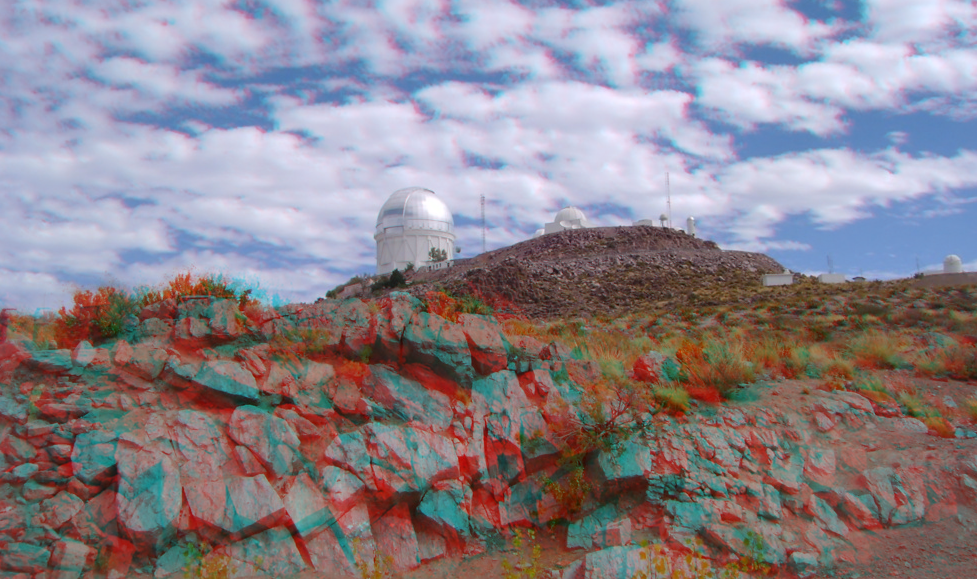 |
| The Cerro Tololo International Observatory (CTIO) in Chile |
 |
| A panda at the San Diego Zoo |
Thank you for sharing this! I’ve been into photography lately and I want to try converting 2D pictures to 3D. This will be a great help because of your easy to follow step-by-step instructions. I hope I can do it right.
ReplyDeleteFrancesca Slone
Hi, I thanks for you to very interesting article. However, I have a question.
ReplyDeleteI wonder to relation of photo and place and layer.
Please teach me.
I think,
left position photo = cyan layer = can see it by red filter(left eye)
right position photo = red layer = can see it by cyan filter(right eye)
(premise: anaglyph glass has red filter at left side, and cyan filter at right side)
But you wrote 'Move the layers so that you have them in this order: Cyan, Image 2, Red, Image 1. Image 1 is the left-hand image I have above and Image 2 is the right-hand image.'
'You take image 1, then you shift by about 10-20 cm or so to the right and, facing the same direction, take image 2. '
So I understood you told image1(left position photo)=red filter, and image2(right position photo)=cyan filter.
I misunderstood anything?
I wonder...
Or... were Photos in Cactus stereogram image which in top of your page invert left photo and right photo?
Please teach me, and sorry to my poor English.
I think you got that mostly right. Part of the misunderstanding could be in how Gimp orders and processes layers, the Cyan layer acts on the layer immediately below it (Image 2, the right image) and the Red similarly acts on Image 1. So the red eye is seeing Red+Image1 (ie, left) and cyan eye is seeing Cyan+Image2 (ie, right).
DeleteI recommend trying it out and switching the images to convince yourself that you got the order right. There's been many times I've made them backwards without realizing it! Hopefully that's not the case in the examples above.
Thank you for your polite reply.But yet I do not understand properly.I think that the relationship between filter and image color will be more complicated, especially from the point of brightness. For example, red filter can penetrate red component of light. So, we can see red picture only when background color is black, because if back ground color was white, red filter penetrate red component form white light. I think that my confusion is from this phenomenon...
DeleteYou told "the red eye is seeing Red+Image1 (ie, left) and cyan eye is seeing Cyan+Image2 (ie, right) ".
But if the surroundings are bright, is not this relationship reversed?
that is,"the red eye is seeing Cyan+Image1"?
Thank you so much for this! I've been trying different tutorials and this one by far produces the best results.
ReplyDeleteHow do I set the layer mode to Screen?
ReplyDelete